Wednesday, April 18, 2012

Mirror MakeOver


So my husband and I found this old mirror at a garage sale a couple of weeks ago. It seemed old and unique with the random handle on the side. So we decided to purchase it with plans to repaint it and give it some new life. 

This is the mirror as we found it at the garage sale.


We decided to paint the mirror white and then give it an antique look but sanding off some of the paint. It is hard to see the antique look in this picture but I think it turned out great!

Finished Project!

This turned out to be fun and easy! I would love to know what you think of the finished project.

Tuesday, April 17, 2012

Photography

I have always had a love for taking pictures. My love continues to grow as I have an opportunity to take pictures of my son. Last year I had a professional photographer come and take pictures of my belly, I wish I could post them here but I can't because I just got prints from the session. One of the photograph is a shot of my belly with baby Nikes (it is super cute). Then there is another of my belly with my Nikes and the baby Nikes. Those two photographs inspired a photo shoot at our home.

Unfortunately, I had to relinquish my camera to my husband in order to get the images that I thought would be great follow-ups to the maternity session. As luck would have it the baby sneakers fit our little guy on his first birthday, so these photos also mark my baby at one year old.

I would love any and all comments on the photos. Again they are pretty close to what I had imagined but I did have to give up the camera lens!


This was the first time Joe was standing on his own! 
I was considering making these images black and white but I just wanted to post the raw image to get some opinions. I am taking these image with my to a photo class on Thursday but I thought I would get a head start here. 

Hope you enjoy the pictures as much as I do!

Saturday, April 14, 2012

Birthday Outfits

I can't believe that my baby boy is already a year old. This past year has gone bye in the blink of an eye. It is so amazing to me how my little guy has grown and changed over the past year. I wanted to get some really cute pictures of Joseph to mark his first birthday. So I wanted to make sure he had some cute clothes to wear for his pictures.

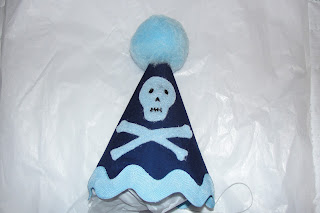
We are having a photographer take some picture of Joseph to mark his first birthday. We are going to have him do a cake smash! I am super excited about this, so I made him this outfit below. The inspiration for this outfit started with the tie that I found at the Children's Place ( I did not make the tie). I then had my mother make the navy blue diaper cover and I added the skull to the butt. Then I made him the party hat below.


The outfit below I purchased at Carters for Joseph to wear for his first birthday party. We did a Noahs Ark theme so I loved the elephant on the outfit. I then hit the fabric store in search of some great fabric to make a party hat for him to wear during his cake smash. My mother was going to make him a bib to match but then she found one at the store so she bought it instead. I love the party hat but Joe did not want to wear it!


Hat, Cake, and Bib 

Joe unhappy in his hat!


Wednesday, April 11, 2012

Easter Poinsettia


I know this is crazy but I created an Eater poinsettia. I bought these  poinsettias on Black Friday for $.98 each and have been working to keep them alive until next Christmas. I have heard that you can keep them alive all year, I don't have a green thumb but I want to try it.
  I put them in white baskets added some tissue paper for Spring color and then added a few Easter eggs I got at the Dollar Store. I think they turned out cute but my Mom said I was crazy! As you can see one of my plants is doing better than the other but I have faith they will both be thriving soon.
What do you think?

Easter Projects-Take 3


I know it is hard to believe that I had time to complete other Easter projects but I was really determined to get a couple more projects in! I saw a bunch of awesome Easter centerpieces on Pinterest, and I was really motivated to recreate one. 


I started out with a large glass jar that I had. Then I found a vase that would fit inside with enough room to put the candy around. Then I put the vase inside the jar and began filling the jar with jelly beans. I got these for free at CVS using Extra Care Bucks. Then added the bunny peeps. I did use a coupon to buy the peeps so they were not free. 

 Then I added a beautiful arrangement of flowers I got at Giant for $10.99. In all I created this centerpiece for $15.00 which I thought was great. I am going to be honest I hated to use the candy because it was a waste of food but it really did create a cute centerpiece.


As a final touch I added some Easter eggs that I picked up at the Dollar Store. I just love the colors of the flowers.


Tuesday, April 10, 2012

Easter Projects- Take 2

Once I had my Easter grass growing I decided to try Silk Dyed Easter Eggs. I am not sure why this seemed like a good idea! I know why, I saw these beautiful eggs on Pinterest and thought I can do this. This project seemed easy enough. I went to the thrift store and bough 6 silk ties and got an old pillow case to cover the eggs.

After I had all of my ties I thought I would hate to have to throw out my beautiful eggs after a week. So I decided to blow out the eggs before decorating. ( I found direction for this online) I will not give any advice on this topic because it was a disaster. I got 7 eggs out of my 12, and it took hours. My best advice is have someone else do this step for you!


The next step was easy or so I thought. I just needed to wrap my eggs with the silk tie ( you do have to take the liner out of the tie) and secure the silk with twisty ties. Then I wrapped each egg with a piece of white fabric. The most important part of this is wrapping the silk as tightly as possible. That will give you a better transfer of the pattern onto your egg.


Finally, you put the eggs in a pot of water with 1/4 cup of vinegar and boil them for 20 minutes. If you choose to blow out your eggs first you will need a metal colander to keep the eggs in the water. Once they are done boiling let them cool and unwrap your masterpiece.


Above you can see  each of the ties and how the egg turned out. I think I should have tied the silk tighter around each egg but I was fearful of breaking my delicate eggs.

Silk Dyed Eggs


Above our my beautiful eggs in a basket of Easter grass that I grew myself.

Easter Projects

This is going to be a couple days late but things were absolutely crazy around this place between Joe's 1st birthday party and Easter. So hopefully some of these ideas will inspire you for next year. I will start with my first project which was growing grass for my son and my two nephews Easter baskets.


This was super easy I just grabbed some of the plastic plant saucers that would fit the bottom of the Easter baskets I had. Then I added soil and quick grow grass seed. Within 7 days I had beautiful grass that did not get stuck to everything like the plastic grass. 

John's Easter Basket

Joe's Easter Basket